Today I’ll share my real-world experience with popen_noshell() on the Nagios monitoring server which we run at work. We are actively monitoring 1166 hosts and 14250 services. The machine has 6 GB RAM and a single Intel Core i7-950 CPU with enabled multi-threading (8 total threads) and slight overclock. Besides running Nagios, this machine also handles the incoming data from our custom monitoring systems, processes RRD database storage, and generates web interface status + charts output. So it’s a pretty busy machine which does a lot of network activity and where the Nagios daemon is just a part of the CPU load. For example, since boot the main “nagios3” process has used only 20% of the CPU. The other part has been used by the fork()’ed Perl scripts (we use a lot of them for the active checks), the Nagios standard network checks, and the Apache/PHP web server handling the incoming data.
Recently the machine started to exhaust its CPU resources. First we overclocked it a bit which gave us 10% more CPU idle time. Then we decided to try to compile Nagios with the popen-noshell library. This gave us another 10% CPU idle and now the machine is working great again.
I’ll focus on the popen-noshell integration and results, since CPU overclocking is a well-known topic. Here is the chart which shows the CPU usage before and after we re-compiled Nagios with the popen-noshell library:
As we can see, the system-CPU usage dropped from 38% to 31%, which is an 18% improvement. The user-CPU usage dropped from 44% to 41%, which is a 7% improvement. Overall, we gained a 12% speed-up for our workload by just re-compiling Nagios with the popen-noshell library. I’m stressing out that the speed-up depends a lot on your workload. If this machine was busy only with Nagios and the active checks were more CPU efficient (i.e. not written in Perl but in C), then the speed-up could have been much higher, since popen_noshell() is about 10 times faster than the standard popen().
A list with the other machine metrics which were also affected by the workload change:
Used memory: 39% => 24% (38% less)
Load average: 39 => 46 (18% higher)
Forks rates: 8*61 => 8*61 (created processes/second – no change)
Here are the steps that you need to perform, in order to re-compile the Nagios Debian package by integrating it with the popen-noshell library:
apt-get install devscripts

apt-get build-dep nagios3-core
# No need to run as "root" from here on
apt-get source nagios3-core

svn checkout http://popen-noshell.googlecode.com/svn/trunk/ popen-noshell

cd nagios3-3.2.1/

# BEGIN: patch Nagios to use popen_noshell_compat()

cp ../popen-noshell/popen_noshell.* base/
vi base/Makefile.in
	OBJS=$(BROKER_O) popen_noshell.o

vi base/utils.c
	#include "popen_noshell.h"

        /* run the command */
        struct popen_noshell_pass_to_pclose pclose_arg;
        fp=(FILE *)popen_noshell_compat(cmd,"r",&pclose_arg);

            /* close the command and get termination status */
            status=pclose_noshell(&pclose_arg);

vi base/checks.c
	2x the same as above

# END: patch Nagios to use popen_noshell_compat()

EDITOR=vim dch -i
	# 3.2.1-2+squeeze1 -> 3.2.1-2+squeeze1-noshell1
	# you must have a trailing number in the added version name
	# after exit, this renames the original directory name

cd ..
mv nagios3_3.2.1.orig.tar.gz nagios3_3.2.1-2+squeeze1.orig.tar.gz

# the source directory was renamed by "dch"
cd nagios3-3.2.1-2+squeeze1/
DEB_BUILD_OPTIONS=nocheck debuild -us -uc

cd ..
sudo dpkg -i nagios3-core_3.2.1-2+squeeze1-noshell1_i386.deb \
	nagios3-common_3.2.1-2+squeeze1-noshell1_all.deb \
	nagios3-cgi_3.2.1-2+squeeze1-noshell1_i386.deb \
	nagios3-doc_3.2.1-2+squeeze1-noshell1_all.deb \
	nagios3_3.2.1-2+squeeze1-noshell1_i386.deb
RESULT="$(echo "$LINE"| awk '{print $1}')" # executes in a subshell
Processing thousands of lines this way however fork()’s thousands of processes, which affects performance and makes your script CPU hungry.
Here is a more efficient way to do it:
LINE="col0 col1  col2     col3  col4      "
COLS=()

for val in $LINE ; do
        COLS+=("$val")
done

echo "${COLS[0]}"; # prints "col0"
echo "${COLS[1]}"; # prints "col1"
echo "${COLS[2]}"; # prints "col2"
echo "${COLS[3]}"; # prints "col3"
echo "${COLS[4]}"; # prints "col4"
If you want to split not by white-space but by any other character, you can temporarily change the IFS variable which determines how Bash recognizes fields and word boundaries.
P.S. For the record, here is the old solution:
#
# OLD CODE
# Update: Aug/2016: I've encountered a bug in Bash where this splitting doesn't work as expected! Please see the comments below.
#

# Here is the effective solution which I found with my colleagues at work:

COLS=( $LINE ); # parses columns without executing a subshell
RESULT="${COLS[0]}"; # returns first column (0-based indexes)

# Here is an example:

LINE="col0 col1  col2     col3  col4      " # white-space including tab chars
COLS=( $LINE ); # parses columns without executing a subshell

echo "${COLS[0]}"; # prints "col0"
echo "${COLS[1]}"; # prints "col1"
echo "${COLS[2]}"; # prints "col2"
echo "${COLS[3]}"; # prints "col3"
echo "${COLS[4]}"; # prints "col4"
If you tried to ping a host with Perl Net::Ping using the ICMP protocol and that failed, even though the “ping” command-line utility can ping the host, you’re not alone 🙂 I had the same problem and it turned out to be due to the fact that Net::Ping by default sends no DATA in the ICMP request and thus its requests are rather short and non-standard. Here are some tcpdump examples:
Net::Ping with ICMP protocol, everything else is defaults: “$p = new Net::Ping(‘icmp’)“, no replies from remote host, note that the length is just 8 bytes:
12:29:02.898083 IP source-addr > source-addr: ICMP echo request, id 2194, seq 41, length 8
12:29:03.711595 IP source-addr > dest-addr: ICMP echo request, id 2194, seq 42, length 8
Linux “ping” command-line utility, remote host replies accordingly, the length is 64 bytes total:
12:30:18.278865 IP source-addr > dest-addr: ICMP echo request, id 2488, seq 1, length 64
12:30:18.289922 IP dest-addr > source-addr: ICMP echo reply, id 2488, seq 1, length 64
12:30:18.790610 IP source-addr > dest-addr: ICMP echo request, id 2488, seq 2, length 64
12:30:18.811029 IP dest-addr > source-addr: ICMP echo reply, id 2488, seq 2, length 64
Net::Ping with ICMP protocol with user-defined length, “$p = new Net::Ping(‘icmp’, 1, 56)“, remote host replies accordingly, the length is 64 bytes total:
12:30:48.377496 IP source-addr > dest-addr: ICMP echo request, id 2488, seq 6, length 64
12:30:48.433690 IP dest-addr > source-addr: ICMP echo reply, id 2488, seq 6, length 64
12:30:48.934310 IP source-addr > dest-addr: ICMP echo request, id 2488, seq 7, length 64
12:30:48.946152 IP dest-addr > source-addr: ICMP echo reply, id 2488, seq 7, length 64
Bottom line is that if you are going to use Net::Ping with ICMP, specify 56 for the “bytes” parameter when creating an instance of the Net::Ping object. This way you will be sending standard ICMP requests with total length of 64 bytes.
I recently migrated my desktop back to Windows, and while I’m at work I need to have regular screenshots of my monitor, for investigation and other purposes. I easily found a solution to record desktop activity by making regular screenshots on Ubuntu, and I thought that Windows solutions will be even more. It turned out to be the opposite — they were all either paid or not working/lacking features.
Here is how “Auto Screen Capture FV” was born. Two screenshots of the interface follow:
It has the following features:
Runs on Windows
Free as speech; open-source, developed with Microsoft Visual C# 2010 Express
Captures a screenshot automatically without disrupting user activity
Saves the snapshot images as compressed JPEG files, in order to save disk space
The destination directory where the images are saved is selected by the user
Rotates too old image files by deleting them, in order to save disk space
All settings are permanently saved in the registry, so next program starts remember what you configured
Auto screen capture can be easily temporarily suspended
Program can run in background; it minimizes to system tray
Old image files are actually moved to “Recycle bin” by default, in order to be on the safe side — if we have a bug, no files are lost. Auto Screen Capture FV has been tested on Windows 7.
Download links:
Installer (there is an uninstaller in the Control Panel)
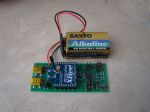
Monitoring and controlling relative humidity is important for humans health. Too low or too high humidity feels uncomfortable, but most importantly high moisture is a factor for growing mold in your home, which could be health threatening (according to EPA and CDC). I will not go into details on how to control humidity. Instead I’ll describe what motivated me to design and create my own temperature and humidity sensor which reports its readings every minute to a central Linux server.
The main requirements for my design were the following:
Affordable price, as I wanted to install four sensors.
Great accuracy both for temperature and humidity readings.
Over-the-air communication, as I wanted to be able to install a sensor even in my bathroom, where I can’t run data or power wires. Support for wired communication too, so that we can reduce the overall price by not installing the wireless module.
Data logging to a computer, because both temperature and humidity change with time, for example when you sleep in the room, and you can’t look at a mechanical temperature or humidity meter every minute, in order to write down the results.
Battery operated, in order to avoid any wiring.
Open-source hardware and software toolchain, so I chose Atmel AVR microcontrollers. I got sick of Microchip and their commercial C compilers.
To have fun with electronics but at the same time create the device as fast as possible, as free time turned out to be a pretty limited resource recently.
I managed to accomplish most of the requirements I set with two exceptions: the device operates only a month on batteries, and cumulatively I spent almost a week to design, solder, develop the firmware, and test the device. Now all the sensors operate from a wall-plug power adapter, and my hunger for environmental control in my house is satisfied.
I’ll now try to describe the whole process and the reasons behind my engineer decisions. Note that I’m an amateur hobbyist.
Idea and requirements
I wrote down all my thoughts in a text editor. Then re-designed all the sticky notes into requirements, and did so a few more times, in order to finally decide what I want to design and not get distracted by new random ideas in my head.
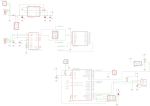
Power supply
I wanted the device to be able to operate both via USB, and thus be powered by 5V, as well as to be powered by an accumulator or a battery with an input voltage up to 12V, so that it could be used in a car too. I put a polarity protection diode D1 in series with the power line, so that an accidental polarity mismatch doesn’t burn out the power regulator. Such a protection diode must have very low voltage drop and thus low power loss, and the Schottky diode 1N5819 seemed like a good match.
Operating from a battery also means that the voltage regulator must be extremely efficient and with a low bias current consumption, which means that it should draw almost nothing while there is nothing connected to it at its output as a load. Most battery operated devices “sleep” during most of their life cycle, so their consumption is close to zero. I used the ultra low-dropout fixed voltage regulator LP2986-33, marked as U1 in the schematics. The whole circuit operates at 3.3V because of the XBee wireless modules, and also because operating at a lower voltage usually gives lower power consumption.
Since we can have two different power sources, there must be a way to choose which one is active. You can switch between the power sources using the PWR_SELECT jumpers.
Wired communication via USB
I wanted to have the option to use the sensors by directly connecting them to a computer. This way we could save the money for an XBee wireless module. I used the classical USB-to-Serial solution FT232R, which is also quite inexpensive and requires almost no external components. You can see it in the schematics as U2. Note that the I/O lines of FT232R must be configured to operate at 3.3V too. This is done by connecting pin 17, which is the internal 3.3V regulator of FT232R, to pin 4. The internal 3.3V regulator is not used for anything else, and in theory I could have powered the I/O lines, pin 4, directly from the main voltage regulator U1.
Wireless communication
The XBee modules is something I wanted to play with for a long time. They seem very easy to work with and are packed with all kind of features. Though in my case I’m not using almost any of them, not even the AES encryption which could secure the data channel. I’m using the Series 1 XBee low-power embedded RF modules (XB24), which have a power of 1 mW and 30 m indoor range. There are many comments in Internet that the indoor range of the XBee modules is poor and I can confirm that. The range really depends on what the signal must travel through. Sometimes you lose the link even through one wall, sometimes it can go through a few walls. The XBee & XBee-PRO OEM RF Module Antenna Considerations is a great article by the XBee manufacturers. After all, probably by using such a low-power module, we shouldn’t expect so great results. It works well in my apartment though — all rooms report to the central XBee module successfully. On the server’s side, the receiver, I first had an XBee with chip antenna, which I replaced with an XBee-PRO with whip antenna. This made no difference.
Wiring the XBee module is very easy. It requires no external components. If you read the PDF datasheet, you’ll see how many great features an XBee has. I’m using only three of them:
Sleep mode — the microcontroller puts the XBee to sleep by controlling the SLEEP_RQ pin 9.
Networking addressing — each XBee is configured with a unique address, so that the receiver on the server side knows which reading belongs to which sensor probe.
API operation — the receiver XBee module operates in an API mode, which is a frame-based protocol that provides greater flexibility and more control. For example, besides the received data payload, an API frame gives information about the sender’s address and the signal quality.
Temperature and humidity sensor
I wanted to interface the sensor directly using a digital protocol, so that we can minimize the ADC stuff and errors. The SHT11 turned out to be the sensor I was looking for:
Relative humidity accuracy: +/- 3% in the range 20% to 80% RH. The sensor comes fully calibrated.
Temperature accuracy: +/- 1.5 degrees Celsius in the range -15 to +65 degrees Celsius.
Digital two-wire interface.
Very low energy consumption: 80uW (at 12bit, 3V, 1 measurement/s).
The SHT11 is a bit pricey but works very easily and accurately out of the box, so I decided to go with it. There is a very good alternative at Sparkfun — the RHT03 humidity and temperature sensor (also known as “RHT-22”). There were some contradictive comments by Sparkfun users — some say it works very well, some doubt its accuracy. I haven’t tried it but have left space JP7 on the current board, so that at some later time I could solder one RHT03 and use it with the existing schematics.
One note about the SHT11 two-wire interface. Definitely use a pull-up resistor on the DATA wire, as advised in the PDF! I tried to do some magic by the microcontoller and failed. With the exception of the pull-up resistor, everything else worked with no other problems with the SHT11 sensor. The manufacturer Sensirion provides Sample code for the SHTxx sensors which turned out to be very useful. I was able to re-code it for the AVR GNU C compiler in a couple of minutes.
The CRC calculation got me a bit confused. There are multiple different ways to calculate a CRC checksum, and they all provide different results. Each CRC calculation depends on the selected CRC polynomial, which is something like a bit-mask that defines the algorithm for the CRC calculation. After lots of struggle, I finally found an excellent Online CRC Calculation web wizard, which also includes a hardware implementation example, and sample C and VERILOG implementations, which you can copy-paste in your program. Thank you Kay Gorontzi!
Microcontroller
Initially I worked with ATmega8. Then I switched to ATmega168 because of the much lower power consumption. I could have used any other Atmel AVR microcontroller which has USART, internal oscillator, and sleep mode. Though ATmega8 or ATmega168 are always available in my local electronics shop, so I chose one of them. Besides the lower power consumption, ATmega168 has one other major advantage for my application — the watchdog timer can wake the chip from sleep mode and directly execute an interrupt, thus not re-starting the program from the very beginning.
Firmware
I’m working on Windows 7 64-bit and used a USBasp programmer to download the code into the microcontroller. The whole development toolchain is packaged into the WinAVR suite. It includes the AVR GCC compiler and the avrdude programmer. I also downloaded a sample Makefile which makes compilation and firmware download easy.
The main loop of the program does two tasks — measures and displays the readings over the serial port (which goes to the USB or over-the-air via XBee), and sleeps for about 60 seconds. As already mentioned, I use the new feature of ATmega168 which allows for the Watchdog timer to generate an interrupt, which wakes the chip from sleep mode. This is very handy as it allows you to continue the program at the point where you put it to sleep. The sleep mode was something new for me; there are some URLs in the source code which show what online articles helped me to master it. Note that the XBee RF transmitter is also put into sleep mode, in order to save battery.
Data collector
All the sensor readings are collected to a Linux server over-the-air. I use an XBee Explorer USB by Sparkfun to connect the XBee receiver with the Linux server. The XBee is seen as a serial device on the Linux box. The frame protocol of the XBee API is easy to understand and I implemented a Perl script to parse it. Here is a sample reading which is received from one of my wireless sensors (0x0001 is the address of the probe standing outside of my apartment):
[Mon Dec 26 17:32:11 2011] RX_packet: source=0x0001, rssi=-55dBm (opt=0x00): 4.24;69.04
As you can see, now it’s winter here — 4.24 degrees Celsius temperature; 69.04% relative humidity (RH).
Board design
Both the schematics and PCB board were designed using Eagle PCB by CadSoft. This is a great piece of software. Most PCB factories accept Eagle board files directly. You’ll find my Eagle files in the Resources section at the end of this article.
Lessons learned
There are a few things which I discovered only once I already built and tested the schematics:
Battery-operated devices are hard to design — in theory my sensors were supposed to last for about 3 months with a 9V battery. In practice only one of them lasted for a month, the others – for a week.
Electronics components, boards and/or assembly could differ a lot — see above. Also one of the SHT11 sensors is sometimes giving CRC errors.
XBee indoor range is not excellent.
Research and development takes a lot of time, usually 2x or 3x the time you planned. Furthermore, building something with love takes even more time, but in the end it pays off with great results and satisfaction.
You can create an electronics device with a lower price than what is currently offered on the marked. But this has its price too — your time, and you get no guarantee whatsoever.
I had different plans for this blog article but it got so lengthy that I wrote it in four different days (and it’s Christmas now). The main idea was to sketch the device and all its components, and to show that they can work together as a finished product. If there is any interest by other people, I’m happy to answer to any questions.
I recently needed to escape some user-supplied input for an URL address variable, in a Bash script. This is what the PHP urlencode(), and Perl URI::Escape::uri_escape() functions do, for example. My initial approach was to call Perl from the Bash script:
Though I wanted to optimize the Bash script by not having to fork() a Perl interpreter every time, which could be CPU intensive if you execute the Bash script often. So I ended up with the following solution, entirely coded in Bash, using Bash string manipulation and Bash hash arrays:
The logic works pretty well, but the performance is terrible. It turned out that the Bash string manipulation methods are rather slow. So I finally ended up by using Perl, the same way I did it initially. For very small strings in the order of a few characters, you should be fine. But for anything else, this implementation is not recommended.
If you still want to use the Bash code, please download it directly from here, because the blog page messed up some of the special ASCII characters.
There is one specific hack here. Since XML allows it to have an element with the same name multiple times on the same subtree level (see <item> on lines #05, #06, #08, #09), and at the same time it does not allow to have an element with only numeric name, we need to make the following exception for arrays which have numeric indexes:
If an element is named <item>, and it has an attribute named “idx”, then we will use this attribute as name, and respectively array key.
This is handled in the XmlCallback() class, method startElement(), lines #44, #45, #46, which are also highlighted. You can see the sources at the end of the article.
XML also allows it that an element contains both DATA and sub-elements. This cannot be parsed into a PHP array, and will result in an Exception.
The parsed PHP array would look like as follows:
Array
(
	[root] => Array
	(
		[first_item] => Test 1st item
		[first_level_nested] => Array
		(
			[0] => value #1
			[1] => value #2
			[second_level_nested] => Array
			(
				[0] => value #3
				[1] => value #4
			)

		)

		[second_item] => Test 2nd item
	)

)
If you liked the results, you can download the sources which follow (click “show source” below):
<?php

function xml_decode($output) {
	$xml_parser = xml_parser_create();
	$xml_callback = new XmlCallback();

	if (!xml_set_element_handler(
		$xml_parser,
		array($xml_callback, 'startElement'),
		array($xml_callback, 'endElement')
	)) throw new Exception('xml_set_element_handler() failed');
	if (!xml_set_character_data_handler($xml_parser, array($xml_callback, 'data'))) {
		throw new Exception('xml_set_character_data_handler() failed');
	}
	if (!xml_parser_set_option($xml_parser, XML_OPTION_CASE_FOLDING, 0)) {
		throw new Exception('xml_parser_set_option() failed');
	}

	if (!xml_parse($xml_parser, $output, TRUE)) {
		$xml_error = sprintf(
			"%s at line %d",
			xml_error_string(xml_get_error_code($xml_parser)),
			xml_get_current_line_number($xml_parser)
		);
		throw new Exception("XML error: $xml_error\nXML data: $output");
	}

	xml_parser_free($xml_parser);

	return $xml_callback->getResult();
}

class XmlCallback {
	private $ret = null;
	/* assign and use references directly to the array, or else you'll be in trouble */
	private $ptr_stack = array();
	private $level = 0;

	public function __construct() {
		$this->ptr_stack[$this->level] =& $this->ret;
	}

	public function startElement($parser, $name, $attrs) {
		if ($name == 'item' && isset($attrs['idx'])) {
			$name = $attrs['idx']; /* reconstruct arrays with numeric indexes */
		}

		if (!isset($this->ptr_stack[$this->level])) {
			$this->ptr_stack[$this->level] = array();
			$this->ptr_stack[$this->level][$name] = null;
		} else {
			if (!is_array($this->ptr_stack[$this->level])) {
				if (!strlen(trim($this->ptr_stack[$this->level]))) {
					/* if until now we got only whitespace (thus scalar data),
					but now we start a nested elements structure, discard this
					whitespace, as it is most probably just space between the
					element tags */
					$this->ptr_stack[$this->level] = array();
				} else {
					throw new Exception('Mixed array and scalar data');
				}
			}
			if (isset($this->ptr_stack[$this->level][$name])) {
				/* isset() == (isset() && !is_null()) */
				throw new Exception("Duplicate element name: $name");
			}
		}

		/* array_push() */
		++$this->level;
		$this->ptr_stack[$this->level] =& $this->ptr_stack[$this->level-1 /* MINUS ONE! */][$name];
	}

	public function endElement($parser, $name) {
		if (!array_key_exists($this->level, $this->ptr_stack)) {
			throw new Exception('XML non-existing reference');
		}

		/* array_pop() */
		unset($this->ptr_stack[$this->level]);
		--$this->level;

		if ($this->level < 0) throw new Exception('XML stack underflow');
	}

	public function data($parser, $data) {
		if (is_array($this->ptr_stack[$this->level])) {
			if (strlen(trim($data))) { # check if this is just whitespace
				throw new Exception('Mixed array and scalar data');
			} else {
				/* we tolerate AND skip whitespace, if we're already in
				a nested elements structure, as this whitespece is most
				probably just space between the element tags */
				return;
			}
		}
		if (is_null($this->ptr_stack[$this->level])) {
			$this->ptr_stack[$this->level] = ''; /* first data input */
		}
		$this->ptr_stack[$this->level] .= $data; /* we may be called several times, in chunks */
	}

	public function getResult() {
		return $this->ret;
	}
}
Update, 20/Jul/2011: The source code was modified to handle white-space better, in order to fix the following tricky sample XML input: <item6> & < </item6>
Update, 30/Jul/2011: Another bugfix which handles empty responses like: <response/>
References:
There are plenty of other (similar) solutions out there:
PHPUnit has a built-in method to test if an expected exception occurred during a test case:
$this->setExpectedException('Exception');
You cannot however test the message of the exception. There are cases where a program may throw the same exception type, but with different messages for different errors, and you want to differentiate between them.
Here is my example code on how to reliably test for the type and message of an exception:
class staticSessionTest extends PHPUnit_Framework_TestCase {
	...
	function test_bad_data() {
		$emess = null;
		try {
			$this->sess->start('must be array', FALSE, FALSE); # we expect an Exception here
		} catch (Exception $e) { $emess = $e->getMessage(); }
		$this->assertEquals($emess, 'Session data must be an array');
	}
	...
}
Putting the assertEquals() outside of the try…catch block ensures that you cannot forget to test for the message. The type of the exception is coded inside the catch(…) block.
UPDATE: I just re-read the latest PHPUnit Annotations, and this feature is already included in the standard PHPUnit suite. The difference between my custom code and the “@expectedExceptionMessage” annotation is that the annotation is valid for the whole test block of execution, while using try…catch you can specify precisely where you expect the exception to occur.
When developing under Google App Engine, developers need to pay attention to how fast their code works, and also how much resources their code uses. The first parameter is vital for user-experience, the second – for the hosting expenses, as resources usage costs money.
It turns out that there are quite a few suitable profilers for Google App Engine. At least these are the ones I could find:
Appstats – no doubt, the most advanced one, giving you information about the timing and costs of your RPC calls to the datastore, Memcache, etc.
Works for both Python, and Java. Included in the official SDK as of version 1.3.1.
appengine-profiler – besides being an RPC profiler like Appstats, appengine-profiler gives you the option to profile the CPU usage of your code, thus you can easily identify hot-spots where your code wastes a lot of CPU resources and wall-clock time. You can define “tracepoints” which surround part of your code blocks, and you’ll easily know the resources usage of these blocks for each page load.
Works for Python.
AppWrench – the Java profiler. I don’t code on Java, and I haven’t tested this profiler, but I’m including it here for all you Java gurus.


")


")
