/contrib/famzah

Enthusiasm never stops


Leave a comment

How to Limit the Download Speed of a Docker Container

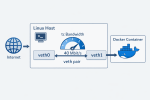
TL;DR: if a container uses the usual Docker bridge networking, you can often limit its download speed from the host with tc and a TBF qdisc. The useful detail is that the container is typically connected through a veth pair, so traffic that is incoming (download) for the container is outgoing (upload) on the host-side veth.

Limiting upload is trivial because Linux shapes egress directly. Limiting download is more awkward, because the packets are already arriving from the outside world and you can’t control how fast a remote host sends packets. But with the usual Docker bridge setup, the host is effectively the last router hop before the container. Once the packets are about to cross from the host namespace into the container namespace, they are host egress and container ingress at the same time. That is the point where we can apply the limit.

This is not meant to be a universal recipe for every Docker setup. It is a short working example for the common case where the container sits behind the default bridge plumbing and has a host-side veth. If you use network_mode: host, macvlan, ipvlan, rootless Docker, or anything more exotic, this exact approach may not apply.

Here is the script I used for one of my Compose services:

cd ~/your-docker-project-compose-dir

CID=$(docker compose ps -q ollama)
PID=$(docker inspect -f '{{.State.Pid}}' "$CID")
IFACE=$(sudo nsenter -t "$PID" -n sh -c "ip -o -4 route show to default | awk '{print \$5}'")
IDX=$(sudo nsenter -t "$PID" -n -m cat /sys/class/net/$IFACE/iflink)
VETH=$(ip -o link | awk -F': ' -v idx="$IDX" '$1 == idx {print $2}' | cut -d@ -f1)

echo "CID=$CID"
echo "PID=$PID"
echo "IFACE=$IFACE"
echo "IDX=$IDX"
echo "VETH=$VETH"

sudo tc qdisc replace dev "$VETH" root tbf rate 40000kbit burst 32kbit latency 400ms
sudo tc qdisc show dev "$VETH"

In this example, 40000kbit means 40 Mbit/s, which is about 5 MBytes/s. The script finds the container PID, enters its network namespace just long enough to discover the default interface, resolves the matching host-side peer, and then attaches the rate limit there.

One practical caveat is that the host-side veth name is not stable across container recreation. If you rebuild or recreate the container, run the script again. To remove the limit later, resolve $VETH the same way and then run sudo tc qdisc del dev "$VETH" root.


2 Comments

Bash: Process null-terminated results piped from external commands

Usually when working with filenames we need to terminate each result record uniquely using the special null-character. That’s because filenames may contain special symbols, including white-space and even the newline character “\n”.

There is already a great answer how to do this in the StackOverflow topic “Capturing output of find . -print0 into a bash array”. The proposed solution doesn’t invoke any sub-shells, which is great, and also explains all caveats in detail. In order to become really universal, this solution must not rely on the static file-descriptor “3”. Another great answer at SO gives an example on how to dynamically use the next available file-descriptor.

Here is the solution which works without using sub-shells and without depending on a static FD:

a=()
while IFS='' read -r -u"$FD" -d $'\0' file; do
  # note that $IFS is having the default value here
  a+=("$file") # or however you want to process each file
done {FD}< <(find /tmp -type f -print0)
exec {FD}<&- # close the file descriptor

# the result is available outside the loop, too
echo "${a[0]}" # 1st file
echo "${a[1]}" # 2nd file

Terminal icon created by Julian Turner


13 Comments

Using flock() in Bash without invoking a subshell

The flock(1) utility on Linux manages flock(2) advisory locks from within shell scripts or the command line. This lets you synchronize your Bash scripts with all your other applications written in Perl, Python, C, etc.

I’ll focus on the third usage form where flock() is used inside a Bash script. Here is what the man page suggests:

#!/bin/bash

(
flock -s 200

# ... commands executed under lock ...

) 200>/var/lock/mylockfile

Unfortunately, this invokes a subshell which has the following drawbacks:

  • You cannot pass values to variables from the subshell in the main shell script.
  • There is a performance penalty.
  • The syntax coloring in “vim” does not work properly. 🙂

This motivated my colleague zImage to come up with a usage form which does not invoke a subshell in Bash:

#!/bin/bash

exec {lock_fd}>/var/lock/mylockfile || exit 1
flock -n "$lock_fd" || { echo "ERROR: flock() failed." >&2; exit 1; }

# ... commands executed under lock ...

flock -u "$lock_fd"

Note that you can skip the “flock -u “$lock_fd” unlock command if it is at the very end of your script. In such a case, your lock file will be unlocked once your process terminates.


4 Comments

Bash: Split a string into columns by white-space without invoking a subshell

The classical approach is:

RESULT="$(echo "$LINE"| awk '{print $1}')" # executes in a subshell 

Processing thousands of lines this way however fork()’s thousands of processes, which affects performance and makes your script CPU hungry.

Here is a more efficient way to do it:

LINE="col0 col1  col2     col3  col4      "
COLS=()

for val in $LINE ; do
        COLS+=("$val")
done

echo "${COLS[0]}"; # prints "col0"
echo "${COLS[1]}"; # prints "col1"
echo "${COLS[2]}"; # prints "col2"
echo "${COLS[3]}"; # prints "col3"
echo "${COLS[4]}"; # prints "col4"

If you want to split not by white-space but by any other character, you can temporarily change the IFS variable which determines how Bash recognizes fields and word boundaries.

P.S. For the record, here is the old solution:

#
# OLD CODE
# Update: Aug/2016: I've encountered a bug in Bash where this splitting doesn't work as expected! Please see the comments below.
#

# Here is the effective solution which I found with my colleagues at work:

COLS=( $LINE ); # parses columns without executing a subshell
RESULT="${COLS[0]}"; # returns first column (0-based indexes)

# Here is an example:

LINE="col0 col1  col2     col3  col4      " # white-space including tab chars
COLS=( $LINE ); # parses columns without executing a subshell

echo "${COLS[0]}"; # prints "col0"
echo "${COLS[1]}"; # prints "col1"
echo "${COLS[2]}"; # prints "col2"
echo "${COLS[3]}"; # prints "col3"
echo "${COLS[4]}"; # prints "col4"


Leave a comment

URL escape in Bash

I recently needed to escape some user-supplied input for an URL address variable, in a Bash script. This is what the PHP urlencode(), and Perl URI::Escape::uri_escape() functions do, for example. My initial approach was to call Perl from the Bash script:

#!/bin/bash
function urlencode() {
	echo -n "$1" | perl -MURI::Escape -ne 'print uri_escape($_)'
}

Though I wanted to optimize the Bash script by not having to fork() a Perl interpreter every time, which could be CPU intensive if you execute the Bash script often. So I ended up with the following solution, entirely coded in Bash, using Bash string manipulation and Bash hash arrays:

#!/bin/bash
set -u

declare -A ord_hash # associative hash; requires Bash version 4

function init_urlencode() {
	# this is the whole ASCII set, without the chr(0) and chr(255) characters
	ASCII='...!"#$%&'\''()*+,-./0123456789:;<=>?@ABCDEFGHIJKLMNOPQRSTUVWXYZ[\]^_`abcdefghijklmnopqrstuvwxyz{|}~ЂЃ‚ѓ„…†‡€‰Љ‹ЊЌЋЏђ‘’“”•–—˜™љ›њќћџ ЎўЈ¤Ґ¦§Ё©Є«¬­®Ї°±Ііґµ¶·ё№є»јЅѕїАБВГДЕЖЗИЙКЛМНОПРСТУФХЦЧШЩЪЫЬЭЮЯабвгдежзийклмнопрстуфхцчшщъыьэю...'
	# download the script, don't copy paste it from the blog page!

	# chr(0) cannot be stored in a Bash variable

	local idx
	for idx in {0..253}; do # 0..253 = 254 elements = length($ASCII)
		local c="${ASCII:$idx:1}" # VERY SLOW
		local store_idx=$(($idx+1))
		ord_hash["$c"]="$store_idx"
		# chr(255) cannot be used as a key
	done
}

function urlencode() {
	local inp="$1"
	local len="${#inp}"
	local n=0
	local val
	while [ "$n" -lt "$len" ]; do
		local c="${inp:$n:1}" # VERY SLOW
		if [ "$c" == "я" ]; then # chr(255) cannot be used as a key
			val=255
		else
			val="${ord_hash[$c]}"
		fi
		printf '%%%02X' "$val"
		n=$((n+1))
	done
}

init_urlencode # call only once
urlencode 'some^fancy#text'

The logic works pretty well, but the performance is terrible. It turned out that the Bash string manipulation methods are rather slow. So I finally ended up by using Perl, the same way I did it initially. For very small strings in the order of a few characters, you should be fine. But for anything else, this implementation is not recommended.

If you still want to use the Bash code, please download it directly from here, because the blog page messed up some of the special ASCII characters.


4 Comments

Backup Google Sites automatically

I just found out how to make my Google Sites backup script almost non-interactive, so I decided to share. My usage pattern of this script is that I run it every month in the Linux console, and then the weekly backup of my hard disk takes care to additionally back up the information.

Why bother backing up Google Sites?
While Google are very reliable and probably they will never fail me here, I want to have an offline backup of my Google Sites pages in case someone steals my Google Account. So I back up. Online and offline, every week.

The backup script uses the wonderful free Java application “Google Sites Liberation“. My script is actually more like a sample Bash usage of this Java tool. You need to download the .jar file and store it in the same directory as the backup script. The source code follows:

#!/bin/bash
set -e
set -u
set -o pipefail

trap 'echo "ERROR: Abnormal exit." >&2' ERR

# config BEGIN

GUSER='username@gmail.com'
WIKI_LIST='wiki1 wiki2 wiki3'
JAR_BIN='google-sites-liberation-1.0.4.jar'
ROOT_BACKUP_DIR='./sites.google.com'

# config END

echo "We are using '$JAR_BIN'. Check for a newer version:"
echo '	http://code.google.com/p/google-sites-liberation/downloads/list'
read

echo "The directory '$ROOT_BACKUP_DIR' will be deleted!!!"
echo 'Press Enter to confirm.'
read

rm -rf "$ROOT_BACKUP_DIR"
mkdir "$ROOT_BACKUP_DIR"

echo -n "Enter the password for '$GUSER': "
read -s -r -e PASS
echo ; echo

for wiki in $WIKI_LIST ; do
	BACKUP_DIR="$ROOT_BACKUP_DIR/$wiki"
	echo "*** Exporting '$wiki' in '$BACKUP_DIR'..."
	echo "Press Enter to continue."
	read

	mkdir "$BACKUP_DIR"
	java -cp "$JAR_BIN" com.google.sites.liberation.export.Main \
		-w "$wiki" \
		-u "$GUSER" \
		-p "$PASS" \
		-f "$BACKUP_DIR"
	echo
done

References:


5 Comments

Beware of leading zeros in Bash numeric variables

Suppose you have some (user) value in a numeric variable with leading zeros. For example, you number something with zero-padded numbers consisting of 3 digits: 001, 002, 003, and so on. This label is assigned to a Bash variable, named $N.

Until the numbers are below 008, and until you use the variable only in text interpolations, you’re safe. For example, the following works just fine:

N=016
echo "Value: $N"
# result is "016"

However… 🙂
If you start using this variable as a numeric variable in arithmetics, then you’re in trouble. Here is an example:

N=016
echo $((N + 2))
# result is 16, not 18, as expected!
printf %d "$N"
# result is 14, not 16, as expected!

You probably already see the pattern – “016” is not treated as a decimal number, but as an octal one. Because of the leading zero. This is explained in the man page of bash, section “ARITHMETIC EVALUATION” (aka. “Shell Arithmetic”).

In order to force decimal representation and as a side effect also remove any leading zeros for a Bash variable, you need to treat it as follows:

N=016
N=$((10#$N)) # force decimal (base 10)
echo $((N + 2))
# result is 18, ok
printf %d "$N"
# result is 16, ok

Note also that there’s another caveat – forcing the number to decimal base 10 doesn’t actually validate that it contains only [0-9] characters. Read the very last paragraph of the man page of bash, section “ARITHMETIC EVALUATION” (aka. “Shell Arithmetic”), for more details on how digits can be represented by letters and symbols. My tests however show that you can’t operate with invalid numbers in base 10, though I’m no expert here. In order to be on the safe side, I would suggest that you validate your numbers with a strict regular expression, just in case, and if you don’t trust the data input.


Resources: